

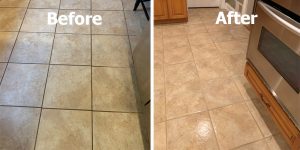
The haze that appears on the marble after grouting is an anticipated event. It is the result of the grouting process and is addressed immediately for two reasons. First, the initial cleaning of the grout is what will define the appearance of the seams. The desired look is a constant depth and width, which also strengthen the union between the marble tiles. Secondly, it won’t be easy to achieve if it is allowed to cure too long after the initial application. In this article, we read about How to clean grout?
Preparation
Step 1 to clean grout
Fill both buckets about three-quarters full with clean, potable, room temperature water.
Step 2 to clean grout
Place a die in each bucket and let it soak for 3-5 minutes.
Step 3 to clean grout
Place a protective cloth on all surfaces that you do not want to be discoloured, moistened or soiled.
Step 4 to clean grout
Designate one bucket for rinsing and the other for cleaning.
Removal of mortar mortar
Step 1
Wring out the cleaning water sponge, leaving about a third of the water in the sponge. Gently wipe the affected area at 45-degree angles to the joints. Regularly adjust the sponge by squeezing it into the cleaning bucket until the entire surface is moistened.
Step 2
Allow the surface to dry for two to three minutes and repeat step 1 using the cleaning bucket. Repeat this process until only a slight haze remains.
Step 3
Now let the mortar and marble dry for 15-30 minutes. This will prevent the seam grout from getting too wet, causing unwanted complications (see tips section).
Step 4
Wring out the final rinse sponge, leaving about a third of the water in the sponge. Clean the affected area gently with angles of 45 degrees until the joints. Regularly adjust the sponge by squeezing it into the final rinse bucket until the entire surface has been moistened.
Step 5
However, allow the surface to dry for two to three minutes and repeat step 4 using the final rinse bucket. Repeat this process until there is no sign of opacity left.
Things you will need
- Two mortar sponges
- Two 5-gallon buckets
- Safety glasses
- Latex rubber gloves
Suggestions
- However, depending on the temperature and humidity in the area to be cleaned, it may be necessary to allow more time for drying. The area is considered dry and ready for further cleaning when the marble surface is dry and the grout begins to lighten in colour.
- So, the joints mustn’t get too wet as this could lead to weakening and dry cracking and remove the material from the joint with the grout sponge.
- When squeezing the sponges, it is better to immerse them in water, squeeze them and repeat the procedure before using them on the marble. This removes as much grout from the sponge as possible.
- So, it may be necessary for challenging areas to use an acid-based chemical cleaner (see reference 1). Try it only as a last resort.
Also read: how to trim dog nails


