

Mac is a brand of computer laptops and iPads of the Apple company. Apple devices have different ways of doing various activities. All the instruments of Mac have additional steps to follow to have a screenshot on it. In the following article, we learn how to screenshot on Mac? So please don’t skip the article from anywhere and read it carefully because it will be very useful for all of you guys.
The screenshot is the need of the day. You should need it to capture the emails, tickets of any event, windows, etc.
To capture the screen on Mac, one should follow the following steps. Screenshots can be taken off the full screen, the selected portion of the screen, or a window to screenshot on Mac.
Step To Follow to Screenshot on Mac
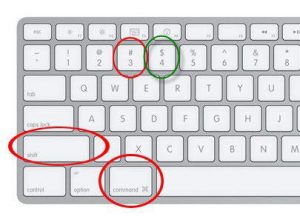
The three keys are used to capture or take a screenshot of the whole screen.
Keys used in this regard
1: Shift
2: Command
3: Number 3 key
To take a quick screenshot, press all these three keys together, and you will have captured it easily.
If you want to edit the screenshot, there is a thumbnail in the corner of the screen. And if you don’t want to edit, wait for the saving process of the picture to screenshot on Mac. The screenshot will be saved on your desktop to screenshot on Mac.
How To Capture A Part Of The Screen?
The screenshot may be taken of some portions of the screen. For this purpose, the keys used are
1:Shift
2: Command
3: Number 4 key
4: Space Bar
So, to get a screenshot of the portion, the screen drags the crosshair to select the area to be captured.
While dragging, press and hold the spacebar to move the selection
To take the screenshot, release the trackpad button or the mouse.
Suppose you want to cancel your selection. Press the Escape key to do this to screenshot on Mac.
How To Capture A Window On Mac?
Steps to capture the window are very simple as well.
Keys used in this regard are
Shift
Command
Spacebar
Number 4 key
To capture a window, open it.
Press all four keys together.
The pointer will be changed to a camera icon.
Now click the window to take a screenshot.
If you want to cancel your selection, press the Escape key.
It depends on which type of Mac you have, MacBook Air, iMac, or MacBook Pro. You have four ways to capture the screen to screenshot on Mac.
The screenshot will be saved as a PNG image on the desktop of your MAC.
How To Take Screenshot On MAC Without a Keyboard
The question is how to capture a screenshot on Mac without a keyboard to screenshot on Mac.
So, there is a Mac pre-installed app called GRAB on your Mac. However, click on the finder and type GRAB. It will open, then right-click on the grab icon to screenshot on Mac. So, it will show you a taskbar with the option of capturing the screen as you desire to screenshot on Mac. Select the required option, and it will turn into a camera icon. Then highlight the area you want to capture when you release it. You have a screenshot of the selected area to screenshot on Mac.
There is an option of Capture time screen, which gives you a 10 second delay time to capture while you can choose another window or menu, etc.
Summary to screenshot on Mac
In short, Mac has changed features to capture screenshots compared to Android. Once you learn, it’s easy to use and have fun with any MAC.
Also read: how to remove pimple marks naturally at home.


