
You have to “photograph” the screen of your trusty. PC but not being very practical in terms. Of computer science and new technologies. How to take screenshot Don’t you have the slightest idea how to do it? Don’t worry, I’m here, ready and willing to provide you with all the info you need. Suppose you allow me a few minutes of your precious time.
In that case, I can explain to you, in data, il, allsible solutions to be able to take a screenshot with Wsuming that it is an effortless operation to carry out and for the implementation of which it is not necessary to be a genius in terms of computer science and new technologies, to succeed in the enterprise, you will not have to download absolutely anything on the PC. All the essential tools and functions are already available “standard” on your computer. If they should not satisfy you. Or if you need to renew. You can turn to unique third-party t tools. Free and straightforward to use.
Then? How abutting the chatter aside and finally taking action? Yes? Very well! I, therefore, suggest that you do not waste any more precious time and immediately get to the heart of the matter. Take a few moments for yourself, make yourself comfortable, and immediately start reading this tutorial. I am sure that in the end. You will be able to tell you more than satisfied with what you have learned. And that even in case of need you will be ready. To provide any explanations to all your friends. Good job!
Standard tools and functions for taking a screenshot with Windows
Are you interested in capturing screenshots of Windows using the standard tools and functions? Then follow the instructions below, and you will see that you will get your screenshots in a flash.
The key combination to take a screenshot with Windows
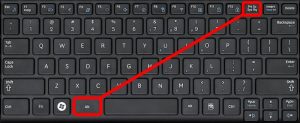
If you prefer the use of keyboard shortcuts and Windows 8 / 8.x or Windows 10, you will surely be pleased to know that you can easily capture screenshots on your PC using a convenient and straightforward key combination: Win + Stamp. If you are not aware of it, the Win key is the one with the operating system’s logo, the flag on it. If there is no Stamp key on your computer keyboard, press Prt Scr or Print Screen to replace it.
The default key combination for capturing screenshots on Windows doesn’t work, you can try using the alternatives listed below.
- Win + Ctrl + Stamp or Prt Scr or Print Screen
- Win + Fn + Stamp or Prt Scr or Print Screen
- Win + Volume key – (minus symbol) if what you are using is a tablet or using all cases, in conjunction with the correct typing of the keyboard shortcut, you will see a rapid darkening of the desktop. Then you can view all the screenshots made by accessing the Images / Screenshots folder of the system. If you prefer, you can change the destination path of the screenshots captured by right-clicking on the Screenshots folder and then choosing the Properties item from the menu you see appear. Then, bearing in the Path tab presses on Move … and indicates the new folder you intend to use to save the screens you have captured. By default, all images are saved in PNG format.
keyboard shortcut
If you need it and if you are using an older version of Windows. You can also make sure that the captured. Screenshots are copied only to the clipboard. Without being automatically saved in the images folder. So that they can be pasted into any other application. How you do it? Nothing simpler. Even in this case. Take advantage of the key combinations. Whichever you find indicated below.
- Print Screen or Prt Scr or Print Screen to copy a screenshot of the desktop to the Windows clipboard
- Alt + Print Screen or Prt Scr or Print Screen to copy a screenshot of the foreground window to the Windows clipboard
Then you can paste the screenshot obtained in any application you want by simply clicking on the Paste button attached to the program’s window in use or pressing the key combination Ctrl + V on your PC keyboard.
Snipping tool
As I told you initially, keyboard shortcuts aside, on Windows, starting from Seven, there is also a tool designed specifically for capturing screenshots: the capture tool. More precisely, thanks to this tool, it is possible to capture single portions of the screen and single windows. It is also possible to modify the images obtained by adding highlights, annotations, and other elements.
You ask me how to make use of it? First, go to the Start menu, search for the snipping tool and start the tool by clicking on the item relating to the latter. You will then see a small toolbar appear on the desktop. To capture your screenshot, click on the New button attached to it and then use the pointer to draw a rectangle including the screen area you want to “capture” by left-clicking and continuing to hold down.
You will then see the capture tool editor appear through which you can make all the ne. You the image using the editing tools available in the window: the pen (to change the stroke color, click on the arrow next to its icon) and ‘ highlighter. If, on the other h you want to delete one or more added elements, you can use the eraser permanently attached to the editor toolbar.
Screenshot obtain
You can then save the screenshot obtained and modified in the form of a GIF, JPG, or PNG file by clicking on the floppy disk icon located at the top left and indicating the preferred file format from the Save as menu: Best electric pressure washer attached to the window that will subsequently go to open up.
As I have already told you a few lines above, the integrated capture tool in Windows allows you to take other types of screenshots. To do so, click the button with the arrow placed next to the button New in the toolbar of the instrument and from the menu that appears at this point, see select Capture accessible format if you prefer to “cut out” with the mouse the screen area to capture, Capture a single window to take a screenshot of a given highlighted window or Full-Screen Capture to take a screenshot of the entire desktop. If, on the other hand, you want to reset the default capture format, press the arrow which is next to the Mode button and choose Rectangular Capture from the menu.
Third-party tools to take a screenshot with Windows
Didn’t the solutions to capture screenshots included in Windows pamainlyttract your attention? Are you looking for alternative instruments to the standard ones? Then try to take a look at the ad hoc solutions that I have indicated below. I’m sure they will satisfy you!
Tip: Install Photo Editor App Here.
Greenshot
The first third-party resource I suggest you try to make your screenshots on Windows is Greenshot. It is a free and open-source program that behaves. In a manner almost similar to the Microsoft OS. Standard capture tool but in an enhanced way. In fact, in addition to all those are the most common functions. For capturing screenshots. It also offers integration with services. Such as Dropbox and Imgur through special plugins.
To download it to your computer, connect to its official website and click on the Latest stable button with the Windows logo. Once the download is complete, open the Greenshot-INSTALLER – 1 installation package. xx-RELEASE.exe and click on Yes and OK, put the checkmark next to I accept the agreement, and press Next three times. At this point, select the Italian option to download the translation files of the program and press the Next button for another three consecutive times. To complete the setup, first, click on Install and then Finish. How to make candles If you don’t want to start Greenshot automatically every time Windows starts, remember to uncheck the Start Greenshot with the Windows start option.
Once the program window is displayed on the desktop, set the use of the Italian language by right-clicking the program icon in the notification area, selecting the Preferences … item from the menu that appears, choosing the Italian option in the drop-down menu Language, and clicking on the OK button to confirm the changes made.
Capture window
Now you can finally take action and take your first screenshot with Greenshot. To do this, press the software icon in the notification area and select Capture region to capture a defined area of the desktop, Capture the last region to re-capture the last portion of the desktop selected, Capture window to capture a given window, or Desktop Capture to capture the entire screen. Alternatively, you can take advantage of the following keyboard shortcuts (which you can change by accessing the program settings).
- Stamp or Prt Scr or Print Screen to capture ananyrea of the desktop
- Alt + Stamp or Prt Scr or Print Screen to capture a given window
- Ctrl + Stamp or Prt Scr or Print Screen to capture the entire desktop
Once the screenshot is complete. You will see a menu appear in the lower right part of the desktop. Through which you can choose whether. To save the screen in a folder ( Save as ), whether to save it in the default folder ( Save directly ), whether to modify it with the editor attached to the software ( Open in Image Manager ), whether to copy it to the clipboard ( Copy to clipboard ), whether to print it ( Send to the printer ) or whether to import it into other applications.
Screenshot
If you are looking for a tool a little more. How to save money How to say. Elementary than the one I just told you about. I suggest you try Screenshot. This is another free and portable program (therefore, it does not require installation to w,ork) for Windows operating systems that allows you to save s immediately, allowing simply pressing the Stamp key (or one of its alternatives) on the PC keyboard.
To download immediately to your computer. Connected to the program’s website. Scroll down the page displayed and then click the Download now button. Once the download is complete. Extract the ZIP archive you just obtained in any option on your PC. And start the Screenshot file inside it. Then click on the Yes button to accept the license. And start using the program.
Now, select the region of the screen you want to capture using the appropriate options attached to the Region section in the software window (you can choose whether to capture the entire screen, a given window, or a defined area), indicate the name of the file you want to use from the drop-down menu under FiFilenameselect the location where the screenshots will be saved on your PC via the Destination section and then press the Stamp or Prt Scr or Print Screen key on the keyboard. Alternatively, you can click the “onscreen” Screenshot button. Very easy, right?
If you have special needs, you can also click on the Settings item in the upper left part of the program window and intervene on the window display, on the selected area on the format and quality of the image, and much more.


